Managing a large number of shipment locations can be time-consuming and error-prone, especially when done manually. To help streamline this process, Tive’s Bulk Location Upload feature allows users to import up to 600 locations at a time using a simple CSV file. This capability is especially useful for teams setting up new customer accounts or managing multiple facilities across regions, making it faster and easier to start using locations in alerts and shipments.
Why Use Bulk Location Upload?
Bulk Location Upload is designed to help you efficiently onboard customers and manage large sets of shipment destinations in a fraction of the time.
Key benefits include:
- Saves time: Upload up to 600 locations at once, significantly reducing manual data entry.
- Streamlines setup: Quickly configure locations needed for alerts and shipment visibility.
- Boosts productivity: Ideal for large enterprises managing multiple facilities or customer destinations.
- Flexibility: Share locations across multiple subaccounts or assign unique sets per account.
How It Works
Step-by-Step Guide:
- Accessing the Feature
- Navigate to the Locations page in the Tive platform.
- Click Import Locations in the top-right corner.
- Preparing the CSV File
- Download the Location CSV Template or make a copy via Google Sheets.
- Fill out the template using the following guidelines:
Column
Requirements
Name*
Unique, max 115 characters
Address*
Full address: street, city, state/province, ZIP, country
Type*
Choose from: Airport, Warehouse, Seaport, etc.
Geofence Radius*
Range: Miles (1–250), Kilometers (1–402), Feet (164–5279), Meters (50–999)
Account ID
Numeric ID for the account (defaults to the current account)
Collaborators
Comma-separated email list (max 50)
Shared
True or False
Collaborator Role
Viewer, Editor, Contributor
Labels
Comma-separated, max 50 characters per label

- Uploading the CSV File
- Save your file in CSV format.
- Click Choose File and upload the CSV.
- Select the geofence unit (Miles, Kilometers, etc.), then click Continue.
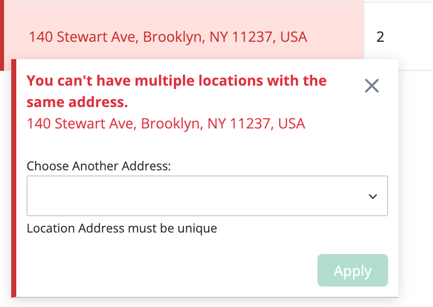
- Reviewing & Fixing Errors
-
- The uploader will highlight any validation issues.
- Click on the highlighted cells to correct errors inline.
- Once resolved, click Create Locations to finish the process.
Key Points to Know
- You must have the Locations (create/edit/delete) permission enabled in your user role.
- Address validation may fail if Google’s API returns multiple results. Use the inline search tool to select the correct one.
- The feature is available across all platform tiers: Essential, Plus, Premium, and Reveal.
- Upload processing time depends on file size, expect 5 seconds to 5 minutes.
Best Practices
To make the most out of Bulk Location Upload:
- Pre-validate your file using the CSV template to avoid upload errors.
- Use the “Shared” column to grant organization-wide access without duplication.
- Assign accurate Account IDs for multi-account organizations.
- Limit collaborator emails to avoid hitting the 50-address maximum.
- Keep labels concise and clear for better filtering and organization.
In case you have any additional questions, you can reach out to support@tive.com for help!