
Why Use Cumulative Temperature Alerts?
A standard temperature alert fires the moment a single reading crosses your threshold, which works well when one spike is the risk. But for many commodities, the real risk is total exposure, not any one reading. A shipment that goes two degrees warm for twenty minutes at four separate dock transfers never trips a standard alert, yet it has spent more than an hour out of range.
Cumulative Temperature Alerts track the total time a shipment spends above or below a threshold across the entire trip and trigger once that time exceeds a budget you define. The time doesn't need to be continuous; every excursion counts toward the same running total.
This is the right alert type whenever your condition requirements are expressed as a time budget rather than a hard limit.
Key elements:
- The problem it solves: a shipment can accumulate significant out-of-range time through several short excursions that a standard, single-reading alert will never catch.
- How it helps: you monitor the time budget directly, instead of manually reacting to individual readings and adding up the exposure yourself.
- Real-life example: the FDA Food Code allows roughly four hours above 41°F before a product is considered unsafe. A cumulative temperature alert lets you monitor that four-hour budget directly.
- Impact: catches compliance and quality risk that repeated handling exposure creates, the kind that adds up across multiple dock transfers, delays, or vehicle changes rather than one dramatic failure.
- How it differs from a standard alert: a standard temperature alert evaluates each reading against a threshold and fires on a breach. A cumulative alert sums time out of range across the whole shipment and fires when the budget is exhausted. Both trigger types can live in the same alert preset; a standard alert for a hard limit, a cumulative alert for total exposure.
How It Works
1. Accessing the Feature
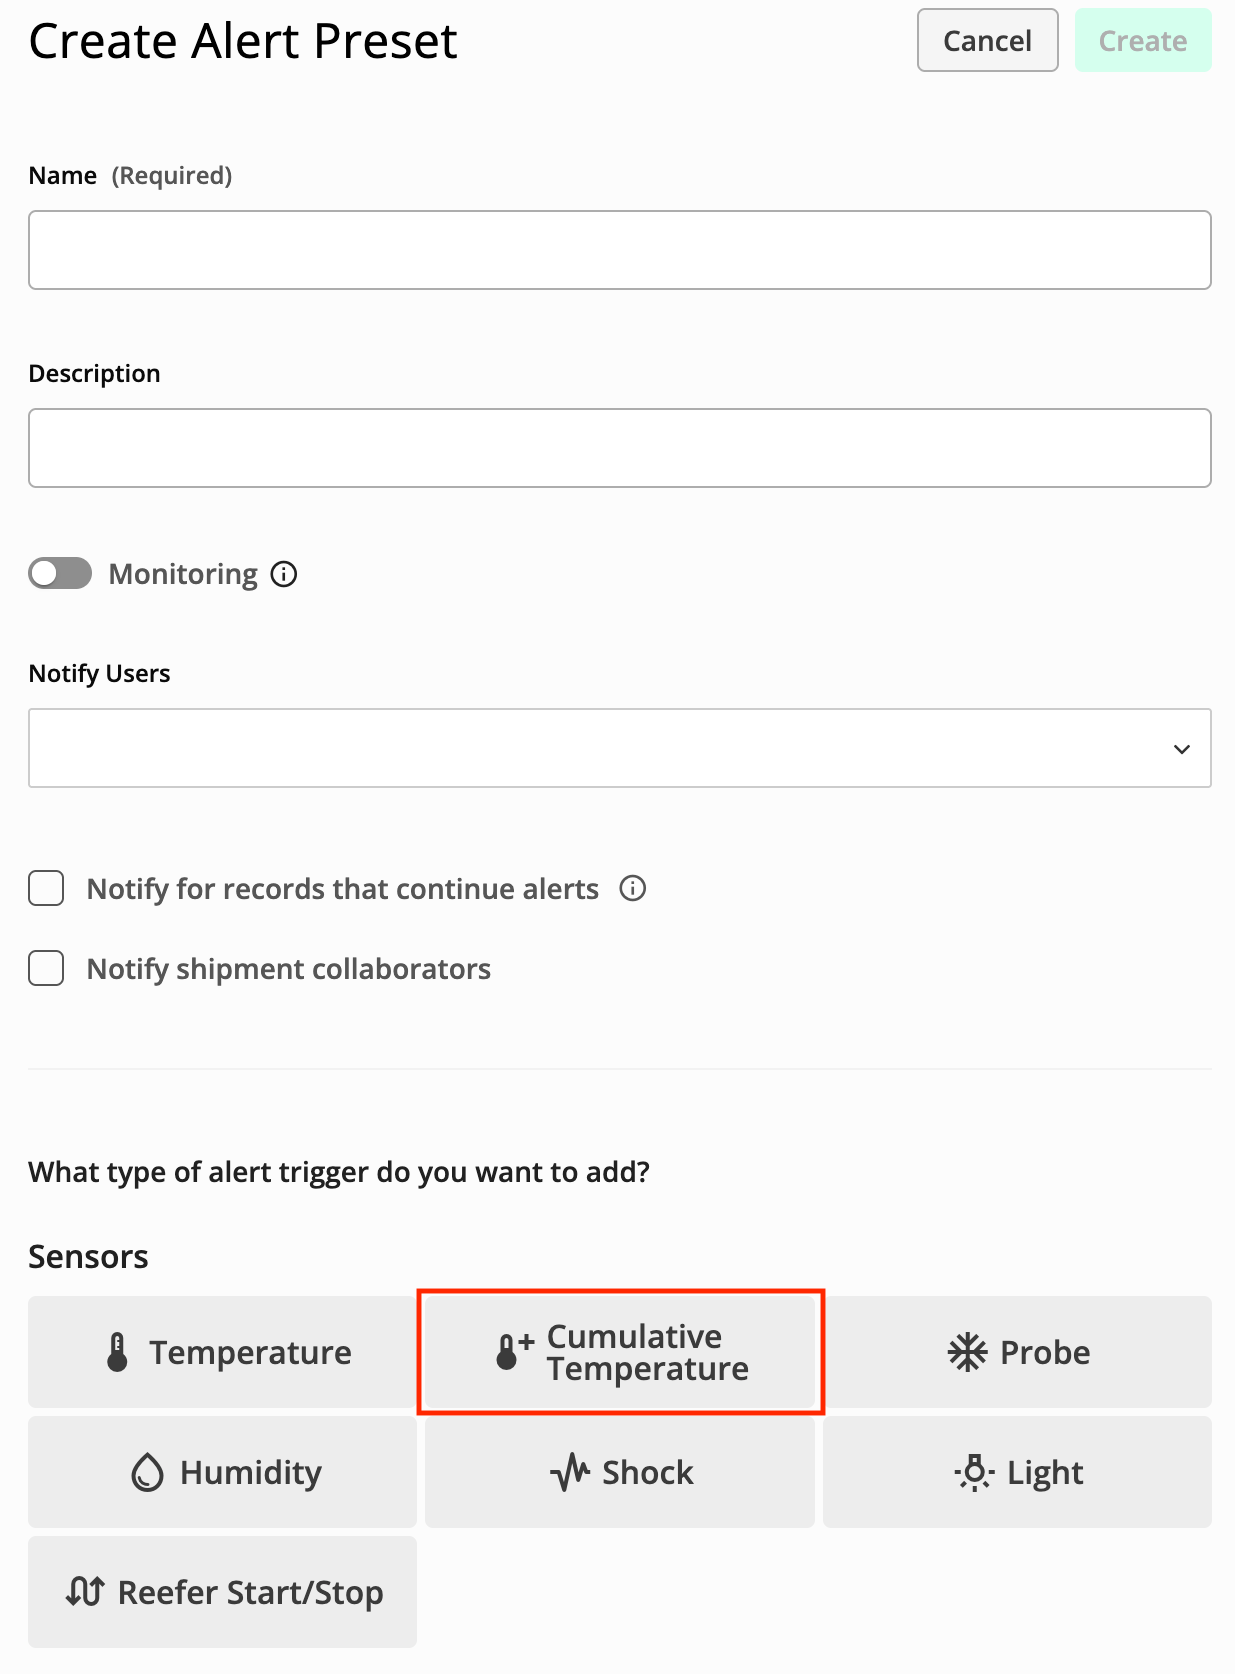
- Navigate to Configure > Alert Presets.
- Click Create Alert Preset.
- Under What type of alert trigger do you want to add?, select the Cumulative Temperature tile in the Sensors section.
2. Enabling / Setting It Up - Device Setup & Alert Precision
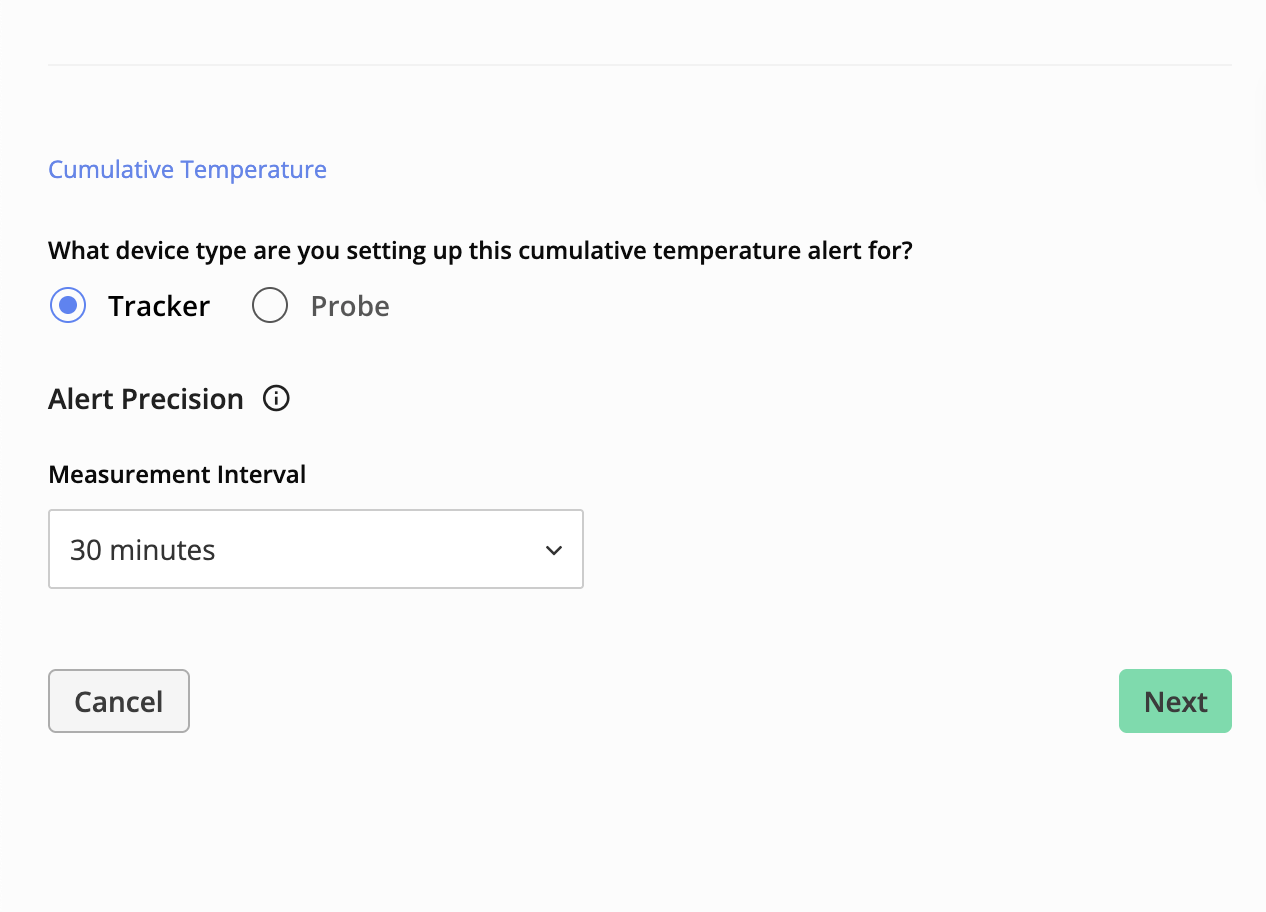
After entering the basic preset information (e.g., preset name), configure the settings unique to a cumulative alert:
- Device type: choose Tracker (default) or Probe. If this alert applies to a dry ice or cryogenic probe attached to a tracker, select Probe.
- Alert Precision / Measurement Interval: choose 5, 10, 20, or 30 minutes. This isn't just a calculation setting; Tive applies this interval to the device itself, so the tracker or probe measures temperature at the interval you select. A shorter interval gives better precision and is less likely to miss a brief excursion. The default and maximum are 30 minutes.
Click Next.
3. Using the Feature - Threshold Rules
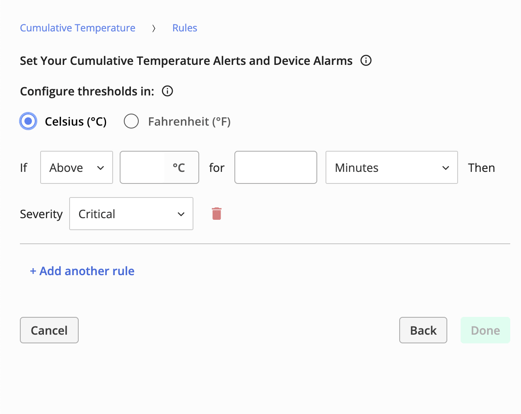
- Under Configure thresholds in, select Celsius (°C) or Fahrenheit (°F). This applies to every rule in the preset.
- Build each rule as a single sentence: If [Above / Below] [temperature] for [duration] [Minutes / Hours / Days] Then Severity [Critical / Warning]. For example: If Above 41°F for 4 Hours, Then Severity Critical.
- Choose the duration unit — Minutes, Hours, or Days — to match how your condition requirement is written, so the rule stays readable to the people responding to the alert.
- Set the Severity to Critical or Warning.
- To monitor more than one budget on the same shipment, click + Add another rule. A common pattern is a Warning rule at a shorter duration as an early heads-up and a Critical rule at the full budget — for a four-hour budget, a Warning at 2 hours and a Critical at 4 hours give your team time to intervene before the budget is gone. Use the trash icon to remove a rule.
- Click Done, then Create to save the preset.
Note: The measurement interval you set in the device setup step applies to every rule in the trigger; a cumulative temperature trigger supports only one measurement interval.
4. Expected Results
Once the preset is attached to a shipment and the shipment departs, Tive begins tracking time out of range against each rule:
- Time accumulates across the entire shipment, not per excursion; four separate 60-minute excursions above your threshold satisfy a 240-minute rule exactly as one continuous four-hour excursion would.
- Accumulation begins at departure. Readings taken before departure are not counted, so time at the origin dock doesn't consume the budget.
- Accumulation ends at arrival. For a shipment still in transit, the running total is current as of the latest reported reading.
- Each rule accumulates independently; a shipment with a 41°F rule and a 50°F rule maintains a separate running total for each.
- When a rule's budget is exceeded, the alert fires at the severity you configured (Critical or Warning) and delivers a notification the same way any other Tive alert does.
Attaching the Preset to Your Shipments
Once created, a cumulative temperature preset behaves like any other alert preset and can be attached in the usual ways:
- Manually, when creating or editing a shipment.
- As a default preset, applied to every shipment in your account.
- As an origin-based preset, attached to a saved location so shipments starting there receive it automatically.
- If you use Automatic Shipments, cumulative temperature presets attach automatically through the Attach alert presets workflow with no additional configuration. See the Automatic Shipments training guide for setup.
Note: cumulative temperature alerts cannot be attached directly to a tracker, they must be attached to a shipment.
Reviewing a Triggered Alert
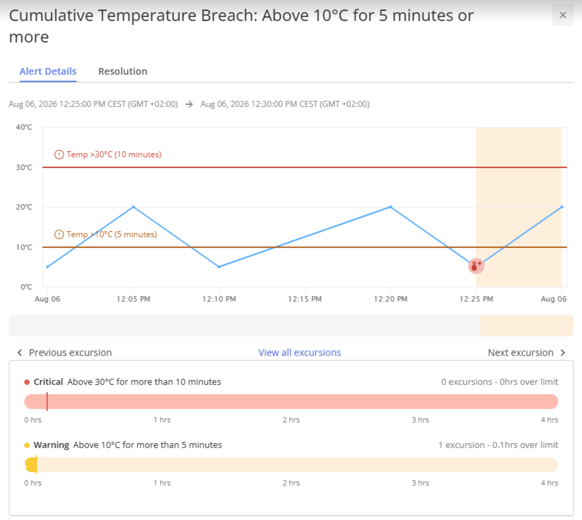
When a cumulative temperature alert triggers, opening it gives you the full accumulation history rather than a single reading:
- Threshold summary bars - how much of the budget each threshold has used.
- Excursion chart - the temperature trace with each excursion marked, so you can see when and where the shipment went out of range.
- Excursion details table - a row-by-row breakdown of every individual excursion, with paging for shipments that have many.
This detail is useful for claims and root-cause work: it shows whether a budget was consumed by one sustained failure or by repeated handling exposure, which usually points to different corrective actions.
Key Points to Know
- Shipment alert, not a device alert. The tracker or probe must be attached to a shipment for the alert to evaluate; it will not evaluate for a device reporting outside of a shipment.
- The shipment must be departed. The alert processor does not begin accumulating until departure. A tracker reporting while the shipment is still in a Pending state will not accumulate time.
- Precision is limited by the measurement interval. Excursions shorter than the selected interval may not be captured, and the interval also sets how often the device measures. The 30-minute default is not appropriate for tight time budgets.
- One measurement interval per trigger. All rules in a cumulative temperature trigger share the same measurement interval.
- Alerts can be withdrawn. If records arrive out of order and later show the threshold was not actually breached, the alert is removed from the platform rather than resolved. Your original email, SMS, or push notification explains why this is expected behavior and does not indicate a problem with the shipment or the preset.
- Cannot be attached directly to a tracker. Cumulative temperature alerts must be attached at the shipment level (manually, as a default, as an origin-based preset, or via Automatic Shipments).
- Presets can be edited after creation, the same as any other alert preset.
- Platform tier: this feature is available on Plus and Premium (Retail Plus is included; Retail Essential is not). It is not available on Essential.
|
Essential |
Plus / Premium |
|
|
Cumulative Temperature Alerts |
❌ |
✅ |
Best Practices
Optimizing Usage
- Match your measurement interval to how tight your time budget is: a shorter interval (5 or 10 minutes) gives finer precision for tight budgets, while the 30-minute default is fine for looser ones.
- Choose the duration unit (Minutes, Hours, Days) that matches how your compliance or condition requirement is actually written, so the rule reads clearly to the people responding to the alert.
Advanced Tips
- Pair a Warning rule at part of your budget with a Critical rule at the full budget (e.g., Warning at 2 hours, Critical at 4 hours), so your team gets an early heads-up before the budget is gone.
- Add multiple rules to monitor more than one threshold on the same shipment; each rule accumulates its own running total independently.
- Combine a standard temperature alert and a cumulative temperature alert in the same preset to catch both a hard limit and total exposure.
Security & Compliance
- Use cumulative alerts to operationalize regulatory time budgets directly, for example, the FDA Food Code's roughly four-hour allowance above 41°F, instead of manually adding up exposure from individual readings.
- When investigating a triggered alert, use the excursion chart and details table to distinguish one sustained failure from repeated handling exposure; these usually call for different corrective actions.
In case you have any additional questions, you can reach out to support@tive.com for help!