Why Use Locations
Locations play a critical role in enabling Tive’s most valuable features. For example, they make sure that alerts are triggered at the proper time and place to reduce supply chain risk. They also ensure that shipment reports used to power critical decisions are reliable and accurate. More specifically, creating accurate locations in the Tive platform enables:
-
Proper Shipment Transition and Completion: When you create Locations with an accurate address and geofence, shipments that use those Locations will reliably register arrival and departure events.
-
Automatic Shipment Notifications: Adding Collaborators to a Location means those people will automatically receive shipment alerts and reports whenever that Location is used. This saves time and ensures the right team members are always in the loop.
-
Effective Monitoring of High-Risk Areas: By configuring “risk zones” with corresponding alerts, you can keep an extra close eye on shipments that enter these zones.
How It Works
Locations are most often used as origins and destinations for a shipment, but may also be used to filter shipments or analytics in the platform. Details that can be configured for a location and inherited when that location is used throughout the platform include:
-
Name
-
Address
-
Geofence (radius or custom shape)
-
Type (e.g., warehouse, store, distribution center, risk zone, airport, seaport)
-
[Optional] Labels (ie, northeast regional stores)
-
[Optional] Collaborators
-
[Optional] Sharing Settings
Creating New Locations
There are two ways to create a Location in Tive:
-
While Creating a Shipment
-
If you type an address not yet saved as a Location, the pencil icon will allow you to create that Saved Location
-
A streamlined modal appears, requiring only critical fields:
-
Location Name
-
Address
-
Location Type
-
Geofence
-
-
-
From the Locations Page
-
Navigate to Configure > Locations.
-
Click Create Location in the top right. You will then see all available location fields, detailed below.
-
Note: If you create a shipment with a location that does not have a geofence configured, the Tive platform will default to a radius of 1km. This may not be the best radius for your use case, so we recommend configuring a location before or while creating a shipment with it.
Available Location Fields
Location Name: What will show up on alerts and reports using this location
-
Must be unique within your account.
Address
-
Must be unique within your account.
Geofence: Will be used to detect departures and arrivals from this location, as well as trigger alerts that depend on location such as ETAs.
-
Simple Radius (default)
-
While in Radius mode, you can drag the pin on the map to move the geofence; this will also update the address.
-
-
Custom Shape
-
Recommended for large or irregular areas (e.g., entire ports, warehouse districts, or risk zones).
-
You can drag individual points on the map to reshape the geofence.
-
Dragging the pin in Custom Shape mode changes the address but does not move or reshape the geofence itself.
-
Location Type: Helps organize the Locations list and paves the way for future reporting and workflows.
- Options: warehouse, store, distribution center, risk zone, airport, or seaport.
Location Labels: Customizable tags (e.g., “Northeast Stores”) to categorize and filter Locations. (Plus Tier only)
-
You can search for existing labels or create new ones on the fly.
Collaborators: Who will receive access to the shipment when shipments use this Location? (Premium Tier only)
Share Location: Share the location across sub-accounts without needing to manually recreate it. (Premium Tier only)
-
If enabled, other sub-accounts in your organization can use this Location in shipments, but they cannot edit it.
-
The ability to share locations is controlled at the sub-account level (see below for more details)
Note: There is no one-size-fits-all rule for how big you should make your location geofences. A smaller radius (~400 meters) is good if your shipment has frequent transmissions and will lead to precise arrival/departure times. A larger radius (up to 5 km) is helpful in areas with low connectivity or infrequent transmissions, ensuring transitions aren’t missed.
Navigating the Locations Page

Go to Configure > Locations. This page has two tabs:
- My Locations
- Shows all Locations you have created, plus those that have been shared with you and Tive-provided Locations
- Tive-provided locations are a curated set of all major global airports and seaports with pre-defined geofences. Because airport and seaport sizes can vary significantly, using these locations helps ensure that shipments transitioning through these hubs register arrivals/departures reliably.
- By default, this page is sorted by # of Shipments that have used that location, from most to least.
- Shows all Locations you have created, plus those that have been shared with you and Tive-provided Locations
- Suggested Locations
- Lists addresses that were used in past shipments but are not saved as official Locations.
- If you delete a Location that was used in a previous shipment, it will reappear here as a suggested location.
Tip: We strongly recommend periodically reviewing the “Suggested Locations” tab to make sure your most-used locations are saved with appropriate details, specifically geofences. This will make sure that your alerts are triggering properly and your shipments are completing in a timely manner.
Viewing a Location
- Click on any Location in My Locations to open its detailed view.
- See its address, geofence, type, labels, collaborators, and whether it’s shared.
- The details page also lists all Shipments that used this Location; clicking one opens that Shipment in a new tab.
- The map will show the geofence.
Editing a Location
What details you can edit of a Location depends on how it was created.
- Locations created in your account: Full edit access.
- Tive provided locations: Limited edit access. You can change the Name, add Labels, and Assign Collaborators. Note that changes will only be saved to the account, not the organization level.
- Locations shared from other accounts: No edit access.
When editing a location, please keep the following in mind:
- If a required field is missing, you must fill it out before saving.
- Editing an address will not change any active or past shipments—they retain the original address.
- Editing a geofence applies to future and ongoing shipments only if they have not yet passed through that location.
Deleting a Location
- Only Locations created in your sub-account can be deleted
- Once deleted, any shipments that used that location will no longer link to it; the address may appear in Suggested Locations for future reference.
Location Label Management
Labels can be customized by our users, added to a location, and used to filter shipments and analytics downstream. Labels are available on the Plus Tier and above. Labels can be added while creating or editing a location. You can search existing labels or create a new one if no matches are found. You can edit and manage all existing labels in the “Manage Labels” button on the top right of the page. Labels can be both edited and deleted.

List Filtering, Sorting, and Searching
In the My Locations list, you can:
Sort by:- Type (alphabetically)
- Name (alphabetically)
- # of Shipments
- Source (e.g., Tive, My Account, Shared)
- Type
- Labels (if labels are enabled)
- Source
Search by Location Name or Address.
Bulk Actions (only for Locations you own in your sub-account):
- Bulk select multiple locations.
- Change Location Type for all selected locations.
- Add Labels to all selected locations.
- Share Locations (if your account has sharing enabled).

Turning on/off Location Sharing
The ability to control whether or not locations can be shared is controlled at the sub-account level (Top right corner > Organization > Accounts > Edit)

Errant Pings
Errant pings (also known as erroneous location points) are typically incorrect location pings that the device transmits to the platform. This is visualized as a significant deviation from the expected route of the shipment that exceeds the above-mentioned acceptable deviation radiuses.
An errant ping will start from anything beyond 500m for cellular, or 100m for wifi network. Errant pings mainly affect Cellular tracking, however, they can also impact WiFi. Whereas, GPS errant pings are not a known occurrence due to the high precision of this location method.
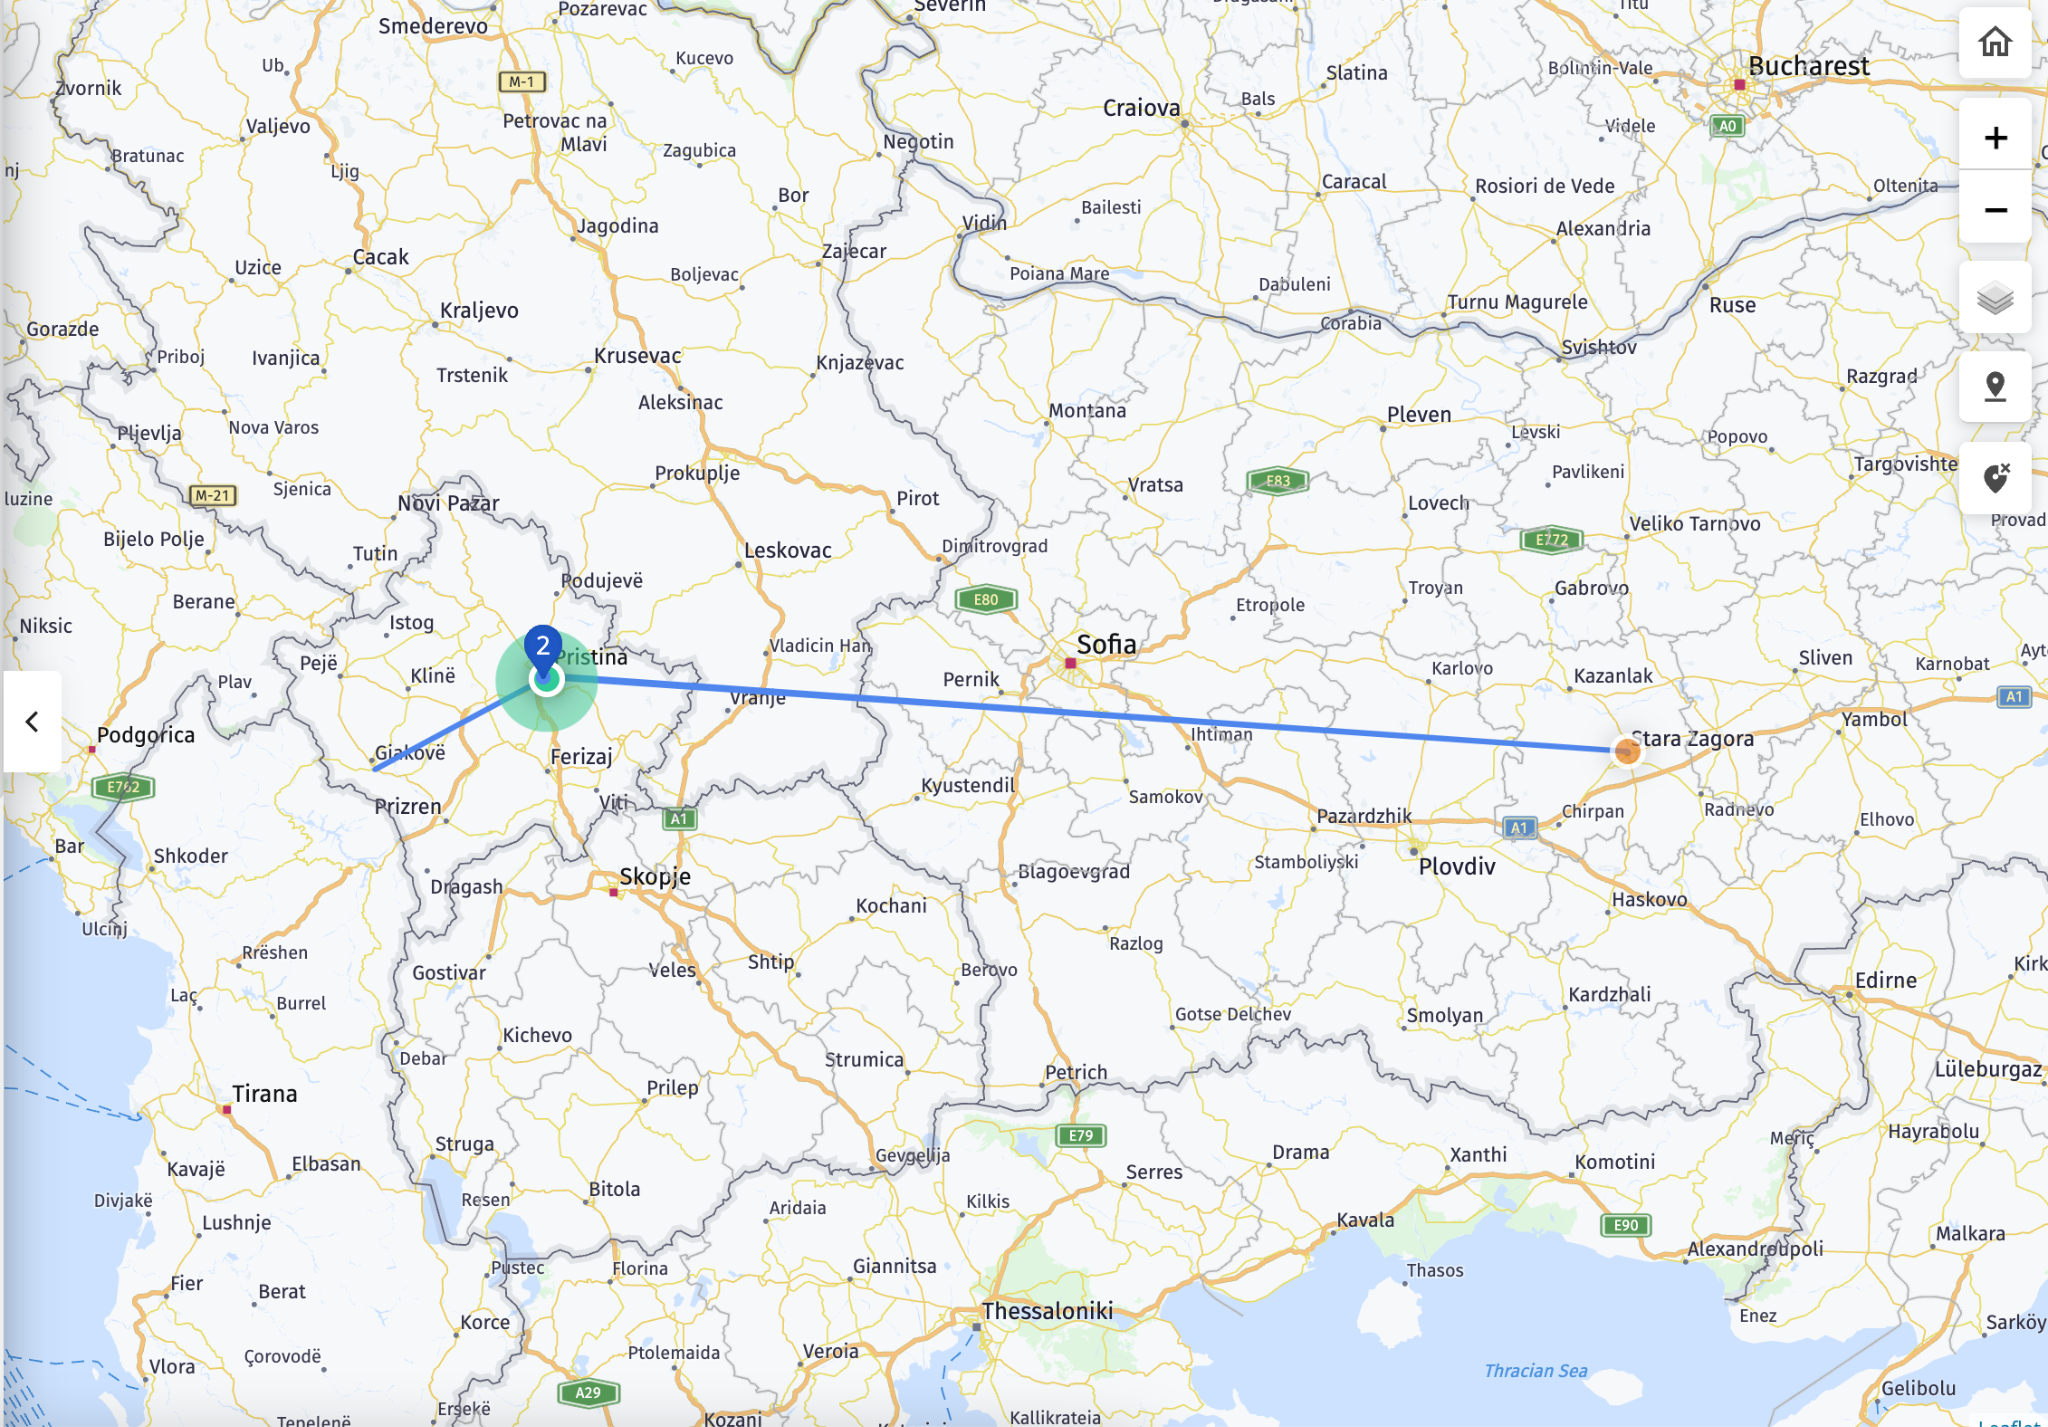
Example of an errant ping. Errant pings are not always the same length. Some of them can be in closer proximity, but still be unrealistic. The distance between the two cities in this example is above is 70km.
Key Points to Know
- How are locations used? - Alert triggers, shipment completion, analytics, and reports all rely on having accurate location details (specifically geofences).
- When is a shipment “in” geofence? - When Tive receives a reading from a tracker, we also get an accuracy bubble indicating that the shipment is somewhere within that estimated area, not necessarily at the center. The system decides a shipment has arrived as soon as any part of the accuracy bubble overlaps the geofence. The system decides a shipment has departed once the entire accuracy bubble no longer overlaps the geofence.
- The size of the accuracy bubble depends on both the detection method (cellular, Wi-Fi, GPS) and external factors like cell tower proximity.
- More precise methods (Wi-Fi, GPS) have smaller ranges, while cellular can vary from ~20 meters to as much as 20 kilometers. We do cap this at 5 km to avoid excessive false positives.
- Duplicate locations: Tive prevents exact duplicates based on address. However, older data may still have duplicates. If 2+ Locations share the same address, Tive will prompt you to merge them on the Locations page.
Best Practices
- Be intentional about geofences: Use a smaller geofence for precise arrival times if your tracker reports frequently. Use a larger geofence (up to 5 km) or operate in low-connectivity areas.
- Keep names and addresses clear: Names must be unique; consider a naming convention that helps people when creating shipments, to be able to easily find the correct location.
- Use labels (Plus Tier): Tags like “Northeast Stores” or “Risk Zone” can help you filter and organize your shipments and their data effectively.
- Leverage collaborators: If your workflow involves multiple stakeholders, adding them at the Location level saves time for future shipments.
- Consider sharing locations across sub-accounts: Sharing, rather than manually recreating, locations across sub-accounts can save time and ensure a consistent Tive experience across sub-accounts. Decide which sub-account manages the “source of truth.” Remember, if you enable sharing, other sub-accounts can use the Location but not edit it.
In case you have any additional questions, you can reach out to support@tive.com for help!