Starting a Tive Tag Shipment
When you start a Tive Tag, you’re telling it to a) begin logging temperature data and b) how frequently to log it. This is a critical step to ensure that you are capturing cold chain data while your shipment is in transit.
Who should use the Start function?
We recommend that the start function be used by designated users at the origin facility who are close to the physical shipping/packing process. You can learn how to create specific roles for these types of users here.
How to Start a Tive Tag Shipment
- If you are planning to adhere your Tag directly to a box/parcel, this should be done prior to activating your Tag with your mobile device.
- Start by opening the Tive Tag app and signing in with your account credentials.
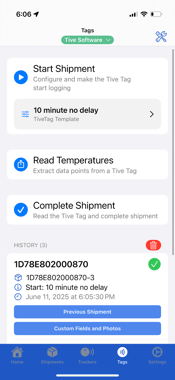
- Once you’re logged in, touch the Start Shipment button.
Don’t know your email and password? Check your email to see if you’ve received an invite to the Tive platform.

Once you select a template, it will be saved for future starts, so that you can quickly start multiple Tags with the same template.


5. Once you see the “Ready to Scan” window, hold your phone near the Tag to begin the Start process.
Do not move your phone away from the Tag while it’s being started.


Attaching custom data when starting a Tag shipment
If you’ve been asked to attach additional data (i.e., consignee name, container number, BOL photos, etc.) to a Tive Tag shipment at the time of shipping, you can follow the steps below.
- Start the shipment according to the steps outlined above.
- In the History log, locate the shipment that you’ve just created (likely the item at the top of the list) and click Custom Fields and Photos.

- You should see any pre-configured custom text fields listed on the screen. Tap on one to add information, then click “Done”.


- To upload shipment images (i.e., BOL document, container seal, etc.) click the Photo Icon in the top left corner, take your photo, and wait for it to upload (as shown below). You will see a success message when it’s finished uploading.


Tip: If your camera is not automatically opening, check to ensure that the Tive Tag app has access to your camera in your phone’s settings.
Troubleshooting
- I’m having trouble scanning the Tag. What should I do?
- If you’re having trouble getting your Tag to scan, try positioning the top of your phone (where most NFC sensors are placed) near the middle of the Tag.
- If you have a large or bulky case on your device, it may interfere with the device’s NFC field. Remove the case and try scanning the Tag again.
- Why am I being prompted to enter a shipment ID?
- Some accounts require that a custom shipment ID be entered before the shipment can be started. This is typically a custom PO or order number that you should enter. If you’re unsure what to enter here, check with your Tive account administrator to confirm what ID they want you to use.